Introduction
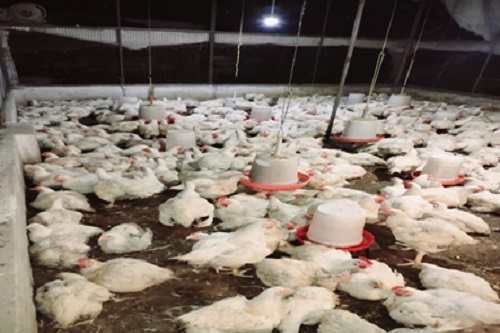
Broiler is a bird of about 8 weeks of age of either sex with an average body weight of 1.5 to 2.0 kg. The cross bred of Plymouth Rock and Cornish are the ones used for meat production. Today India is the 5th largest producer of broiler meat in the world with an annual production of 2.47 million MT. Despite this achievement, the per capita availability per annum of poultry meat in India is only 2.96 kg (ICMR recommendation is 11 kg)
Broiler Management
It is the set of all management practices including housing, feeding, watering, vaccination etc. from receiving of Day-Old Chick (DOC) to the day of selling them. It is necessary as poultry is highly prone to various diseases which often leads to heavy losses. Efficient management will lead to multi fold increase in the production and profits.
Advantage of Broiler Farming
- Initial investment is a little
- Rearing Period – 35 days
- More number of flocks can be taken in the same shed.
- Broiler has high FCR.
- Faster return from the investment.
- Demand for poultry meat
Broiler Production and Management
|
Sr. No |
Pre-Arrival | Sr. No |
Post-Arrival |
|
1 |
Selection of site for poultry farm |
1 |
Starting the chicks |
|
2 |
Essential equipments |
2 |
House Environment |
|
3 |
Biosecurity |
3 |
Humidity |
|
4 |
Shed cleaning and disinfection |
4 |
Heat stress and control |
|
5 |
Procedure for fumigation |
5 |
Space management |
|
6 |
Preparation of shed to receive chicks |
6 |
Curtain management |
|
7 |
Housing |
7 |
Brooding and different types of Brooders |
|
8 |
Pre-heating |
8 |
Brooder Management |
|
9 |
Litter |
9 |
Brooding Temperature |
|
10 |
All in all out systems |
10 |
Lightening for Brooders |
|
11 |
Managing the flock and the flock record |
11 |
Nutrition |
|
12 |
Preparation for chick arrival |
12 |
Diets and Dietary Treatments |
|
13 |
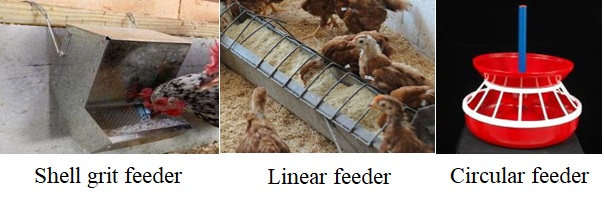
Feeder Management | ||
|
14 |
Water Management | ||
|
15 |
Litter Management | ||
|
16 |
Vaccination Schedule | ||
|
17 |
Carcass Disposal |
Pre-Arrival
1. Selection of site for poultry farm
- Well connected with roads.
- Electricity and water.
- Enough space for further expansion.
- Located in the open space as it provides good ventilation.
- Water quality: Hardness-below 750 ppm and pH-6.0 to 8.
- Foot bath
- Death pit
Place Selection
- Poultry house should be dry, up ground & away from locality.
- Ensure pure water & electricity supply.
- Predators & others animal are not allowed in the farm.
- Ensure good transport system for marketing of poultry.

Important considerations
- House should be constructed in east- west direction
- Should have good transport system
- Ensure good ceiling system for summer system
- Should have proper ventilation system that remove excess heat
2. Essential equipments
- 1 feeder per 50 chicks
- Chick drinker: 1 drinker per 50 chicks.
- Jumbo drinker: 1 drinker per 50 birds.
- Weighing Balance
- Raking equipment
- Hover brooder or Gas Brooder: 1 gas brooder per 1000 chicks.
- Coal Heater: 1 heater per 350 chicks.
- Hand or power sprayer.
- Flame gun
- Feeding scoops.
- Measuring cups for medicines.
- Automatic vaccinator.
3. Biosecurity
- Farm Materials: Feeder, waterer, fan, door, windows hover, net should be washed in the following way:
Detergent
![]()
Washing Soda
![]()
Disinfectant
- Fumigation: (for 200 sq ft)
Potassium per manganate- 40gm
Formalin- 80 gm
Note: Formalin should be put out over PPM
4. Shed Cleaning and Disinfection
- Maintaining optimal health status of birds.
- Immediately after the birds are lifted, empty the feeders, disconnect the drinkers and remove them out of the shed.
- Clean the shed from top to bottom (roofs, side walls, wire mesh)
- Soak the floor for 12 hours using 2 kg washing soda with 50 litres of hot water for every 1000 sq. ft.
- Clean the equipments with detergents and remove the scales in drinkers using hydrochloric acid.
- Equipments should be kept outside for sun drying.
- Formalin spray: 5% solution of formalin spray for every 1000 sq. ft. (500 ml+10 litres of water).
- White wash the walls and floors using limestone (Lime + Kerosene + Formalin)
- Clean and mop the bulbs and other electrical fittings.
5. Procedure for Fumigation
- done 48 hours prior to the chick arrival.
- fumigated with 2 kg bleaching powder and 4 litres of formalin for every 1000 sq. ft.
- after fumigation rooms should not be opened till the day of chick arrival (48 hours).
Potassium permanganate method
- 2 parts of formalin mixed with 1 part of KMNO4 for complete expulsion of gas.
- Single strength concentration: mixing 40 ml formalin with 20 g KMNO4 for each 2.83 m3 of space
- Double strength: 80 ml of formalin with 40g of KMNO4 for each 2.83 m3.
6. Preparation of Shed to Receive Chicks
- 1 or 2 days prior to the arrival of chicks, spread the litter material (paddy husk, saw dust) about 5 cm thickness.
- Spread old newspapers over the litter to avoid eating the litter.
- Arrange chick guards.
- Arrangement of feeders and waterers under brooder.
- 4 kg of newspaper for 1000 sq. ft. area
- Round brooding is better and more effective than rectangular brooding.
- For round brooding of 350 nos. of chick, one 40 ft. length plain G.I. sheet of 1.5 ft. height will be required.
7. Pre-Arrival Management: Housing
- Housing should be cost effective, durable and provide a controllable environment
- Select a well-drained site that has plenty of natural air movement.
- The house should be oriented on an east-west axis to reduce the effect of direct sunlight on the sidewalls during the hottest part of the day
- The main objective is to reduce the temperature fluctuation during any 24-hour period.
Floor Space
- First 2 week 5 sq ft/chick should provided
- In summer season 1.2 sq ft and winter 1sqft place should be provided.
Organizing the House
- This will depend on 3 principal elements:
- The type of house and level of insulation
- The heating system (whole house or local)
- The watering system (round–type, nipple or trough)
- Whole House
- If the house is well insulated (or in a warm climate) use 80 to 100% of the house
- start the chicks in the centre of the house with a fence on each side, 2 – 3 meters from the wall
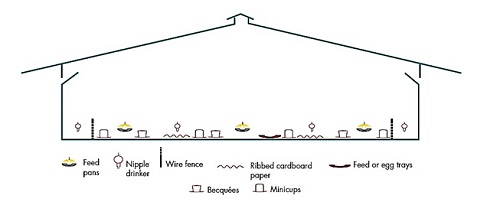
- For 1000 chicks: 5 plates, 5 new egg trays, 6 – 7 m of paper under the nipples 0.70 m wide, 40 – 50 nipples, 5 minicups
8. Pre-Heating
-
- The preheating must be sufficient to heat the whole surface area to a level of 28 – 30°C
- Prevents ammonia production and anaerobic fermentation
- According to climatic conditions, insulation of the house and quantity of litter, the preheating time can vary between 36 hrs in summers and 48 hours in winters
- Cold litter when the chicks arrive can be the origin of nephritis, diarrhoea and leg problems
Stocking Density
|
|
| House Type | Density |
| Open Sided | 30 kg/m2 (6.2 lb/ft.2) |
| Solid Wall | 35 kg/m2 (7.2 lb/ft.2) |

Localized Heating
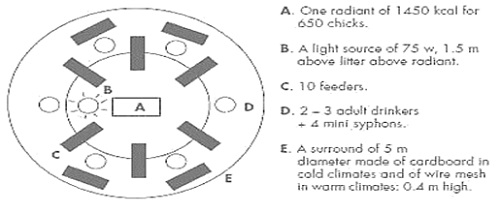
- In poorly insulated houses, do not exceed 40 chicks per m2 in the brooding area (650 chicks in a 5 m diameter circle)
- The placement of the equipment should be such that the chicks can always find water and feed
- Recommended layout for 650 chicks
Final Disinfection
- Carried out 24 hours before the chicks arrive
- Spraying of insecticide like Permethrin 5.7% EC Spray, Dilute 7 tsp./gal or 1 qt/25 gal for .05% solution
- Painting walls with Calcium Carbonate
- Use 400 mL of Formaldehyde and 200 g of potassium permanganate for each 1000 cubic ft. of air space (28 cubic m). Fumigate for 24hrs
- Footbath of calcium carbonate outside house and allowing entrance only of authorized workers
9. Litter
- During brooding, the litter acts as insulation and comfort for the baby chicks
- The type of litter used can be: shavings, chopped straw, rice hulls, recycled paper- should be dry, non-corrosive and good absorbing
- Shavings or chopped straw can be used in a temperate climate 2 kg/m2 in summers, 5 kg/m2 in winters
- pre–warm the litter to eliminate condensation due to its contact with the cold floor
10. All In, All Out System
- All birds in the shed/farm should be of the same age group and preferably of the same breed and source of supply. If this is not possible minimize the number of age groups on the farm
- This system is strongly recommended for maximum exploitation of genetic potential of birds
- Efficient management, sanitation and vaccination programs become more complicated and less effective in multiple age sites.
11. Managing the Flock
- The signs of a good quality chick are:
- its activity
- some chirping
- absence of respiratory anomalies
- a properly healed navel
- Weight and uniformity are also important
- Weigh 200 chicks at random for an accurate average
12. The Flock Record
In organizations where all information is required, this record should contain all the data about the flock
- The principal data required:
- Hatch date
- Chick origin, donor flock, hatchery
- Daily mortality split into its different types (heart attack, locomotion, etc.)
- Bodyweight taken at their arrival and thereafter, each 5 days
- Feed company, delivery date, type of feed, quantity
- Daily feed and water consumption
- The vaccination dates, batch number, treatment, products, quantity (dosage and dates).
13. Preparation for Chick Arrival
- Litter material should be spread evenly to a depth of 3–4 in (7.5–10 cm) and then levelled and compacted in the brooding area.
- The necessary equipment must be assembled in the appropriate configuration as-
Feeder- 30 inch long/ 50 chicks
Waterer- 2 litre capacity/ 50 chicks - Equipment in the house (i.e., feeders, drinkers, heaters and fans) should be arranged to allow chicks to maintain body temperature without dehydration and to find feed and water easily.
- Houses should be pre-heated for a sufficient period to achieve target house and litter temperatures prior to chick arrival.
Post-Arrival / After Arrival
1. Starting The Chicks
Firstly, provide lukewarm water for 2-3 hrs then provide following solution-
Glucose-50gm/ litre, Multivitamin -1gm/4 litre, Electrolytes- 1gm/ 2 litre
Provide instant energy and restore normal body function.
Note: feed should be supply after 3 hrs on arrival to avoid early enteritis in chicks
2. House Environment
Ventilation
- Air quality is critical during the brooding period.
- Ventilation is required during the brooding period to maintain temperatures at the targeted level and to allow sufficient air exchange to prevent the accumulation of harmful gases such as carbon monoxide, carbon dioxide and ammonia.
- Establishing minimum ventilation rates from one day of age will ensure fresh air is supplied to chicks at frequent, regular intervals.
- Stirring fans can be used to maintain evenness of air quality at chick level.
Lighting
- In first 3 days is required for complete 24 hrs.
- increase the feeding time, increase weight gain, and improve feathering in broiler.
- Measured in Lux units using Lux meter.
- For day old broiler chicks, an intensity of 100 lux units at bird’s eye level
- This can be achieved by providing one 100 watts round bulb at 2 ft height from the floor level for every round brooding.
- After brooding an intensity of 20 lux is required for birds which can be achieved by providing 40-watt tube light at 6 ft. height.
- Light intensity should be uniform throughout the farm.
- A tube light emits around 60 lux for 400 sq. ft. at 6 ft height.
Temperature
- Maintenance of correct temperature is essential.
- It varies as per atmospheric conditions
- During 1st week is 33°C (95°F) good
- To be reduced by 2.6°C (5°F) each week till it reaches to room temperature of 21°C (70°F).
- Temp is measured 6 cm above the litter.
- Too high or too low temp results in
- slow feathering
- retarded growth
- pecking and mortality
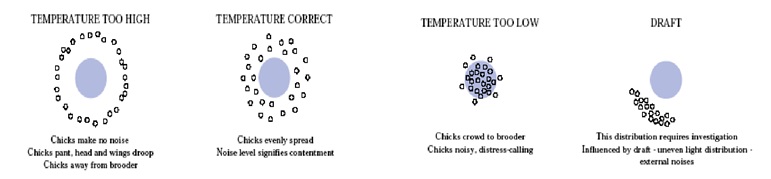
- Behaviour and distribution of chicks under and around brooder is the best guide for judging correctness of temperature instead of thermometer.
- When Temp is less – chicks will try to hurdle near the source of heat
- If temp is too high – chicks will go away from source of heat, near to the guard and remain there with dull movements. Even chicks may show panting also.
- If birds congregate themselves in masses in brooder space it indicates daftness of weather.
- If temp is favourable: evenly spread under and around brooder with alert and pleasant movements.
- Based on chicks’ position and movement, adjust the temperature.
- The height of the brooder at day old stage – 15-30 cm above the litter level.
- As the chicks grows, the height will be gradually increased and the number of bulbs gradually reduced.
3. Humidity
- Relative humidity (RH) in the hatcher, at the end of the incubation process will be high (approx. 80 percent).
- Houses with whole house heating, especially where nipple drinkers are used, can have RH levels as low as 25 percent.
- Houses with more conventional equipment (i.e., spot brooders, which produce moisture as a by-product of combustion and bell drinkers, which have open water surfaces) have a much higher RH (usually over 50 percent).
- To limit the shock to the chicks of transfer from the incubator
- RH levels in the first three days should be maintained near 70 percent.
- RH within the broiler house should be monitored daily.
- If it falls below 50 percent in the first week, chicks will begin to dehydrate,
- Causing negative effects on performance.
- In such cases, action should be taken to increase RH.
- If the house is fitted with high-pressure spray nozzles (i.e., foggers) for cooling in high temperatures, then these can be used to increase RH during brooding.
- Chicks kept at appropriate humidity levels are less prone to dehydration and generally make a better, more uniform start.
- As the chick grows, ideal RH falls.
- High RH from 18 days onward can cause wet litter and its associated problems.
- As broilers increase in live weight, RH levels can be controlled using ventilation and heating systems.
4. Heat Stress
- Heat stress negatively affects growth rate and liveability.
- Effects of heat stress can be minimized by altering the environment to reduce the temperature experienced by the bird.

Control Of Heat Stress
- Normal body temperature of a broiler chicken is 106ºF (41ºC).
- Broilers regulate their body temperature by two methods:
- Radiation/convection of heat and
- Evaporative cooling through respiration.
- Within the temperature range 55–77ºF(13–25ºC), heat loss is mainly accomplished through physical radiation and convection to the cooler environment.
- As the temperature rises above 86ºF (30ºC) the majority of heat loss is accomplished by evaporative cooling and panting, and increased respiration rate.
- Panting allows the bird to control body temperature by evaporation of water from the respiratory surfaces and air sacs.
- The process uses energy. In conditions of high humidity, panting is less effective.
- Where high temperatures are maintained for long periods, or humidity is very high, panting may be insufficient to control body temperature and the bird may experience heat stress.
5. Space Management
|
Age (days) |
Space/bird (Sq. ft.) |
| 0-3 | 0.22 |
| 4-7 | 0.22-0.30 |
| 8-14 | 0.30-0.45 |
| 15-21 | 0.45-0.60 |
| 22 onwards | Full space |
- Expand the brooding area gradually
- Overcrowding leads to huddling, dampness of litter, multiplication of disease-causing organism.
- Less space gives away to competition, which causes to become weak and die due to starvation.
- Inadequate space and improper equipments alignment will decrease the bird performance
6. Curtain Management
- Generally, in brooding period the side curtain should be more tightly sealed to preserve heat.
- This closed environment to the broiler farms may result in reduced air circulation.
- In such circumstances when you feel uncomfortable open side curtain and give fresh air.
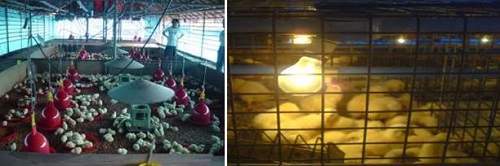
7. Brooding
- Management of baby chicks till 4 weeks in broilers and around 6-8 weeks in layers is called as brooding.
- The device used for providing artificial heat during brooding is called as brooder.
8. Different types of Brooders
- Infra-red bulbs
- Heating coils
- Gas brooders
- Kerosene stove
- Coal/charcoal stove
- Centralized heating system
- Battery brooders
- Biogas brooders
- Infra-red bulbs: heated quickly. They are self-reflecting in nature and can provide warmth for 200 to 250 chicks, but it is expensive.
- Gas brooding is now practiced particularly in semi-environmentally controlled and environmentally controlled houses. These are costly but can take care of 1500 to 2000 chicks.
- Heater coils may also be provided for warmth instead of bulbs. These coils are more suitable for cold climates, because they give more heat.
- Centralised heating system – environmentally controlled
- Battery brooders –Bulbs or heaters with thermostats are used to provide warmth to chicks in the battery cages.
- Bio-gas brooders – Certain farms use the cage droppings and cow dung to generate bio-gas; which will be used to provide light and heat to the birds.
- If kerosene stoves or coal stoves are used, a metal vessel with sand is placed over the stove to dissipate heat properly.
- Brooding area – 0.22 sq. ft per chick.
- Newspaper
- Switch brooder to pre heat the brooding area 6 hours before chick arrival.
- Fill the chick drinkers with water about 4 hours before chick arrival.
- Add sanitizer, electrolytes, antibiotic powder and B-complex to water
- First 72 hours paper feeding
- Put plenty of feed on the paper for the chicks (20 gm/day/chick) on paper.
- tyre feeders
- Dip the beak of the chicks in the chick drinker for 10% of the chicks to learn to drink.
- monitored closely for first three days
- Examine the crop
9. Brooder Management
- Chick Guard: For 1000 chicks, it should be 24 ft long & 12 ft width
- Brooding Management: The chick’s position relative to the heat is an important indication to judge whether the house environment is comfortable

10. Brooding Temperature
|
AGE (WEEKS) |
DEGREE (F) |
Degree (°C) |
| 1st | 90-95 | 32-35 |
| 2nd | 85-90 | 30-33 |
| 3rd | 80-85 | 27-30 |
| 4th | 75-80 | 24-27 |

|
Age in days |
Temperature | Ventilation | |||
| Local brooding |
Whole house heating |
% Humidity |
|||
| Under the brooder |
Living Area |
||||
| 0-2 | 32-34 | 29-31 | 30-32 | 55-60 | Level of Ventilation: 0.8 – 1 m3 /kg live weight from the start until 21 days. Elimination of carbon monoxide, removal of NH3; air speed < 0.1 m/s |
| 3-6 | 31-33 | 28-30 | 28-30 | 60-65 | |
| 7-9 | 39-29 | 26-28 | 26-28 | 60-65 | |
| 10-12 | 28-30 | 25-27 | 25-27 | 55-60 | |
| 13-15 | 27-29 | 24-26 | 24-26 | 55-60 | |
| 16-18 | 26-28 | 23-25 | 23-25 | 65-75 | |
| 19-21 | 25-27 | 22-24 | 22-24 | 60-70 | |
| Measure temperature at chick level | |||||
| 22-25 | 21-23 | 21-23 | 60-70 | Ventilation variation: 0.8-6 m3 / kg live weight elimination of humidity | |
| 26-30 | 20-22 | 20-22 | 60-70 | ||
| 31-35 | 18-20 | 18-20 | 60-70 | ||
11. Lightning for Brooders
- Radiant of 3500 watts capacity and higher can be hung at a height of 1.50 – 2.50 m in well–insulated houses and used for whole house heating
- Radiant of 1700 watts capacity operated in poorly insulated houses, should only be used for localised brooding and hung at a height of 1.20 m – 1.50 m
- Use 23 – 24 hours light for the first 3 – 5 days to encourage feed and water consumption
- Light intensity should be 5 watts/m2 when using incandescent bulbs and 60 lux for fluorescent tubes
12. Nutrition: Feed And Feeding
- Feed being the major expenditure that is around 60-70% and also significantly affects the production performance
- During the early brooding period, feed should be provided in crumble form on supplemental feeders (1/100 chicks) so chicks have easy access.
- Types of feeds:
|
Age in days |
Type |
| 0-7 | Pre-starter |
| 0-17 | Starter |
| 18-27 | Grower |
| 28-till the day of selling | Finisher |
Nutrition: Feed
- Broiler starters ration – 22-23% protein and 3050Kcal energy.
- Broiler finisher – 20-21% protein and 3150 Kcal energy.
| Suggested Nutritional Requirements | |||
|
Nutrients |
Age in Days | ||
|
Pre-Starter |
Starter |
Finisher |
|
| 0-10 | 11-21 |
22- Finish |
|
| M.E. Kcal/kg | 2900-2950 | 3050 | 3150 |
| Crude Protein % | 22.00-22.50 | 21.50 | 20.00 |
| Ether Extract % (Min) | 3.50 | 4.50 | 6.50 |
| Crude Fiber % (Max) | 4.00 | 4.00 | 4.00 |
| Calcium % | 1.00 | 1.00 | 1.00 |
| Available Phosphorous % | 0.45 | 0.45 | 0.45 |
| Sodium % | 0.18 | 0.18 | 0.16 |
| Chloride % | 0.17 | 0.15 | 0.15 |
| Linoleic Acid % | 2.00 | 3.00 | 3.50 |
| Lysine % (Min) | 1.30 | 1.20 | 1.05 |
| Methionine % | 0.55 | 0.50 | 0.45 |
| Suggested Nutritional Requirements | |
| Vitamins | To be added |
| Vitamin A iu/kg | 15000 |
| Vitamin D3 iu/kg | 3000 |
13. Diets and Dietary Treatments
-
- Diets primarily compose of corn, wheat, soybean meal/fish meal, vitamins.
- Following table presents nutrient requirement for different ages of bird.
| Calculated Analysis | Pre-Starter | Starter | Grower | Finisher |
| Protien % | 22.5 | 20.0 | 20.0 | 18.5 |
| Ca % | 1.0 | 1.0 | 0.95 | 0.95 |
| Phosphorus % | 0.63 | 0.62 | 0.58 | 0.57 |
| Fat % | 6.04 | 6.48 | 7.35 | 8.12 |
| Fiber % | 3.49 | 3.27 | 3.27 | 3.15 |
| Ash % | 5.77 | 5.51 | 5.3 | 5.16 |
| Salt % | 0.49 | 0.49 | 0.45 | 0.38 |
| Energy (kcal/kg) | 3050 | 3120 | 3180 | 3250 |
Nutrition: Feeding Schedule
- Recommended daily feed requirement/bird
- The table shows daily feed consumption in grams/bird/day and daily weight gain in grams/day
| Age in days | Weight in grams | Body Weight gain/day |
| 1st day | 20 gm/bird/day | 44-55 gms |
| 2nd day | 22 gm/bird/day | 55-95 gms |
| 3rd day | 24 gm/bird/day | 95-135 gms |
| 4th day | 26 gm/bird/day | 135-175 gms |
| 5th day | 28 gm/bird/day | 175-215 gms |
| 6th day | 30 gm/bird/day | 215-255 gms |
| 7th day | 32 gm/bird/day | 255-295 gms |
| 8th day | 34 gm/bird/day | 295-335 gms |
| 9th day | 36 gm/bird/day | 335-385 gms |
| 10th day | 38 gm/bird/day | 385-425 gms |
| 11th day | 40 gm/bird/day | 425-465 gms |
| 12th day | 42 gm/bird/day | 465-505 gms |
| 13th day | 44 gm/bird/day | 505-545 gms |
| 14th day | 46 gm/bird/day | 545-585 gms |
| 15th day | 48 gm/bird/day | 585-625 gms |
| 16th day | 50 gm/bird/day | 625-665 gms |
| 17th day | 52 gm/bird/day | 665-705 gms |
| 18th day | 54 gm/bird/day | 705-745 gms |
| 19th day | 54 gm/bird/day | 745-785 gms |
| 20th day | 56 gm/bird/day | 785-825 gms |
| 21st day | 58 gm/bird/day | 825-865 gms |
| 22nd day | 60 gm/bird/day | 865-905 gms |
| 23rd day | 62 gm/bird/day | 905-945 gms |
| 24th day | 64 gm/bird/day | 945-985 gms |
| 25th day | 66 gm/bird/day | 985-1025 gms |
| 26th day | 68 gm/bird/day | 1025-1045 gms |
14. Feeder Management
- Feeder should keep neat & clean.
- To treat feeder by disinfectant regularly.
- Keep appropriate no. of feeder on basis of population
- Provide 24 hrs pure water at daily basis
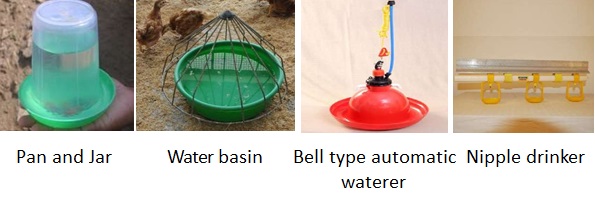
15. Nutrition: watering
- First 10-14 Days
- This water should be available in chick waterers (mini-drinkers etc.), which should be frequently cleaned and filled.
- 7 Days until Market
- Allow 2cm of watering space per chick when using trough-type waterers.
- When determining drinker placements ensure that birds need not to travel over 8 ft. to get water.
- Drinkers should be washed daily with KMnO4 (10mg/L) water solution
|
Age in Days |
Water consumption per 1000 broilers birds per day (litres) | |||
| 21.1°C | 26.7°C | 22.2°C |
43.3°C |
|
| 0 – 7 | 27 | 28 | 32 | 78 |
| 8 – 14 | 72 | 85 | 122 | 216 |
| 15 – 21 | 108 | 153 | 248 | 324 |
| 22 – 28 | 144 | 200 | 324 | 432 |
| 29 – 35 | 184 | 256 | 400 | 552 |
| 36 – 42 | 221 | 302 | 464 | 663 |
| 43 – 49 | 256 | 340 | 510 | 768 |
| 50 – 56 | 280 | 352 | 536 | 840 |
In temperatures above 25°C water consumption increases and above 29°C additional drinkers should be provided.
The height of drinkers should be adjusted in such a way that the brim of the drinkers should be in a level corresponding to the bird’s back
16. Litter Management
- In winter season litter should be 2-3 inch & for winter season 4-5inch depth
- Daily spray with disinfectant
- Moisture level should be kept in minimum level
- Moist litter should dry in sun heat & treat with surface agent.

17. Vaccination Schedule
| For control of principle Viral diseases | |||
|
Disease |
Age | Route |
Strain |
| Marek’s disease | 1 day | SC | Turkey herpesvirus and SB-1 |
| Newcastle disease | 1 day or | Coarse spray | B1 |
| 14–21 days | Water or coarse spray | B1 or LaSota | |
| Infectious bronchitis | 1 day or | Coarse spray | Massachusetts |
| 14–21 days | Water or coarse spray | Massachusetts | |
| Infectious Bursal disease | 14–21 days | Water | Intermediary |
Vaccination
- Should maintain cool chain of vaccine
- Should be vaccinate at cool environment i.e. morning or late night
- Diseased or weakness bird should be separate from normal one.
- Maintain appropriate route of administration
- For better efficacy vaccinate with non-fat milk
18. Carcass Disposal
- The immediate burning or burying of dead birds is an important part of a good disease prevention program
- Dead birds act as a source of disease that can be spread by rats, dogs, mosquitoes, free flying birds and insects that may act as carriers of the disease. The two most acceptable methods are described below:
- Incinerators
- Disposal Pits
Incinerators
A good incinerator is probably the best means of disposal, especially in an area where there is poor soil drainage or a danger of contaminating the water supply.
Disposal Pit
Birds decompose fairly rapidly without the use of chemicals pit 6 ft. (1.83 m) in diameter and 6 ft. deep (1.83m) is large enough to take care of one 10,000-capacity broiler unit.


Be the first to comment