Introduction
In dairy farming it is important to note the direct link between the wellbeing of the cows and the profitability of the dairy farm. Among others, a good milking technique is of utmost importance. No single duty in the dairy operation carries as much responsibility as does the actual job of cow milking. The continuous use of proper milking routine results in higher milk yields of good quality, fewer problems with udder health, longer cow life expectancy and reduced milking time. All these factors contribute to a higher profit margin per cow. Good milking is a skill that can be learned through practical experience.
Harmonious interaction between milker and cow is of utmost importance with regard to the amount of milk a cow produces and hence to the farm’s profitability. The conditions at the dairy farm in question determine the choice of hand or machine milking. Whichever system in use, the milker should be familiar with basic milk secretion and udder conformation of the dairy cow. Full understanding of how the cow produces milk and how a milking machine functions to remove that milk is essential.
Characteristics of good hand and machine milking are
- A regular and good milking routine under optimal conditions will result in high milk yields.
- The quality of the milk produced must be up to the highest hygienic standards.
- The risk of udder infection must be reduced to an absolute minimum.
- The physical and mental effort required from the milker or operator should be acceptable and he should perform his duties within an appropriate environment.
Characteristics of mammary system
Udder confirmation
The udder is the most important part of the cow. Ideally, the udder should be symmetrically shaped with a level floor and carried well above the hocks. The teats should be uniform, of medium length and diameter, cylindrical, squarely placed, plumb, and be well-placed from side and rear views.
Udder structure
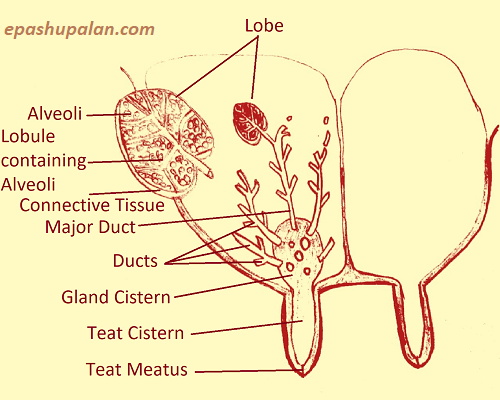
The suspensory ligament divides the udder into two halves and each half is again divided into two separate quarters: two fore and two rear quarters. Although the fore teats are usually a bit longer than the rear ones, the capacity of the rear quarters is larger. At the lower end of the teat is the teat or streak canal. The streak canal is about 1 cm long and is encircled by a strong teat-closing muscle; the sphincter. The strength of this muscle determines the ease of milking and milking speed. Inside the teat is a cavity, the teat cistern, which is connected to the gland cistern. The walls of the cistern are very sensitive and they can easily be damaged through incorrect milking. About 20 to 25 large milk ducts empty into the gland cistern. These ducts branch out, away from the cistern, becoming narrower and narrower, until they end in alveoli lined with glandular cells. Milk is formed within the alveoli and in a well-developed udder there are about 2 billion of such alveoli, grouped in clusters.
Considerations for machine milking
Udder preparation (stimulation)
- Before milking, the cow must be prepared. Proper udder preparation stimulates the cow to let down her milk. It removes microorganisms from the udder and teat skin, thereby reducing the risk of udder infection. The main actions in udder preparation are:
- Cleaning the teats and the udder itself, so that the milk cannot be contaminated with dirt during the milking process.
- Checking the foremilk for abnormalities.
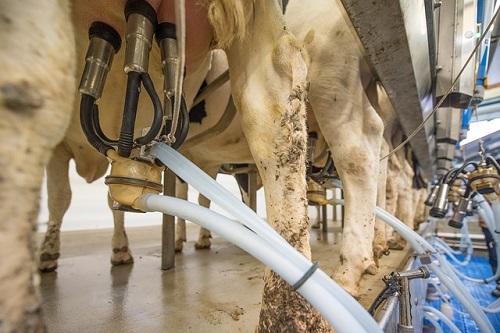
Attaching the milking machine unit
- The teat cups should be gently attached in a correct manner and with minimal loss of vacuum. The cluster unit must be applied correctly to the teats, usually within 30 seconds from the end of stimulation or as soon as the teats are full of milk. With cows accustomed to proper milking practice this time can be reduced following stimulation.
- Teat cups should be removed gently after shutting off the vacuum supply to the cluster unit. The removal of the cluster unit has top priority over all other operation.
Attentiveness during milking
- At all times close attention must be given to the functioning of each cluster unit of the milking machine to achieve optimal milkout.
- Correct attachment of the teat cups, without suction of ‘free air’ is essential to avoid the spread of mastitis pathogens or the sucking in of dirt.
Removal of clusters units
- It is good practice to remove the cluster unit soon after the milk flow has stopped.
- Teat cups should be removed gently after shutting off the vacuum supply to the cluster unit.
Disinfection of teats
When the clusters are removed, there is a minimal amount of milk on the teat end. If left there to dry, it may act as a culture medium for bacteria and may attract disease-carrying flies. To prevent this, it is recommended that teats should be dipped or sprayed with a disinfectant, such as chlorine hex dine or organic iodine solution as soon as possible after milking.
Feed cows after milking
The cows should stand for at least 1 hour after milking to allow the teat sphincter to close tightly and the teat dip to act as an efficient barrier against environmental infections. Providing fresh feed at the feed racks will keep cows standing.


Be the first to comment